Featured Post

Customize Course Navigation in Canvas

In Canvas, instructors are empowered to control the appearance of the navigation menu in their course. One reason to do this is to direct st...

Showing posts with label canvas. Show all posts

Monday, August 29, 2016

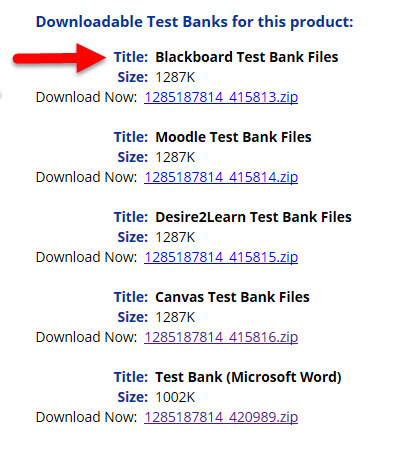
The Many Adventures of Test Bank Installation, Pt. 2: Importing Blackboard test banks

Blackboard has been a dominant LMS throughout higher education for many years. As a result, most publishers provide question banks formatted for the Blackboard LMS. Canvas users are able to import these question banks into their courses. Follow the steps below to import a Blackboard test bank.

1. Obtain the Blackboard test bank from the publisher's website.

a. Locate the instructor resources on the publisher's website.
b. Select the link to the test banks.


c. Accept the license agreement.
d. Download the test bank files.
   2. Once you have obtained the file, right click on the resulting .zip file and select Extract all.
   A small window will appear where you will select a location on your computer for the files. Select     Extract.


e. Extract files.
3. Open the extracted file folder; notice that there is a .zip file for each chapter. 


f. Folder with extracted files. 


g. Notice that each chapter has a .zip file; these should remain zipped for the next step.
4. Open the Canvas course.

5. Navigate to Settings.


h. Course settings

6. Select Import Content into This Course from the right side of your screen. (note: on some smaller computer monitors, the content normally on the right side may display on the bottom of the screen when you scroll down.)

i. Import content into this course link at the right of the screen.

5. From the Content Type drop down menu, select Blackboard 6/7/8/9 export .zip file. (See video below step 9)

6. Browse for the file on your computer and select. (See video below step 9)


7. From the Default Question bank dropdown menu, select Create new question bank. (See video below step 9)


8. Select the All content radio dial. (See video below step 9)


9. Select Import, and wait for the file to upload. (See video below)


10. Repeat steps 6 - 9 for each chapter.

The Many Adventures of Test Bank Installation, pt. 1 - Importing .QTI Files

Beginning this week, the FaCIT Update blog will share a series of posts on the topic of inserting test banks into Canvas courses. Each post in this series will illustrate another method to install a test bank in Canvas based on the type of test bank provided by the publisher.

As Canvas gains market share in Higher Education, more publishers are providing test banks formatted for the Canvas LMS. Canvas test bank files have the .QTI extension.  Should you be so fortunate as to have access to a test bank formatted for the Canvas LMS, importing it to your course will be easy. Follow the steps below to successfully import your Canvas test bank.

1. Download the test bank from the Publisher's website.

a. Locate the instructor resources on the publisher's website.

b. Select the link to the test banks.


c. Accept the license agreement.


d. Download the test bank files.

2. Once you have obtained the file, right click on the resulting .zip file and select Extract all.
A small window will appear where you will select a location on your computer for the files. Select Extract.


e. Extract files.


3. Open the extracted file folder; notice that there is a .zip file for each chapter.

f. Folder with extracted files.
g. Notice that each chapter has a .zip file; these should remain zipped for the next step.
4. Open the Canvas course.

5. Navigate to Settings.

h. Course settings

6. Select Import Content into This Course from the right side of your screen. (note: on some smaller computer monitors, the content normally on the right side may display on the bottom of the screen when you scroll down.)
i. Import Content into this course link at the right of the screen.

7. Select .QTI zip file from the drop down menu.

j. .QTI file.
8. Browse for, and select, the .zip file for the chapter you need. (See video below step 10)

9. Enter a name for the test bank; FaCIT advises including the author's name and edition of the book or the semester and year in the name in order to identify the bank for deletion when a new edition is adopted in the future. (See video below step 10)

10. Select Import, and wait for the file to load. (See video below)


11. Repeat for each chapter.


Monday, August 1, 2016

Customize Course Navigation in Canvas

In Canvas, instructors are empowered to control the appearance of the navigation menu in their course. One reason to do this is to direct students to resources in the most straightforward way possible. The best way to direct students is by linking all resources and assignments on the Modules page. This is simplest for students, ensuring that they see all of the linked resources for a unit in the order in which it is organized and presented.

Another reason to control course navigation has to do with the manner in which Canvas handles course files. If the Files link is visible to students, students can access every course file that has been published in the history of a course, even if the link to it has been removed from the Modules page. By directing students to files via a link on the Modules page, you can be sure they are viewing and downloading the correct file.

Canvas provides an excellent step-by-step tutorial for customizing navigation.

FaCIT suggests that most instructors will want to leave the following items visible to students:

Home
Announcements
Syllabus
Modules
People
Grades
NetTutor
Attendance (will not be visible to students, but leaving it in the main navigation section will make it much easier for instructors to see and use)

FaCIT suggests that the following items be hidden from student view, with each relevant item instead linked to the Modules page.

Files
Assignments
Quizzes
Conferences
Collaborations
Discussions
Outcomes
Pages

FaCIT recommends that SCORM remain in the visible section of the navigation while uploading a SCORM unit; after the unit is uploaded and linked on the Modules page, the SCORM navigation link can be moved to the hidden section of the course navigation panel.


Monday, June 20, 2016

The In's and Out's of Canvas Inbox

One of the more basic functions of an LMS is to facilitate various types of communication between instructors and students. Below are a few tips for using the Conversations tool, also known as Inbox, in Canvas.

  • Publish your course before trying to message students. 
  • Prior to the first day of the semester, you will also need to adjust your course settings so that the start date of your course is prior to the day you wish to send the message. You will need to check the box under the Start/End dates to select “Users can only participate in the course between these dates.”
  • SVCC Canvas courses will conclude on the last day of final exams each semester; instructors cannot message students from the course after the course has concluded.
  • If a student replies to an email notification, attachments will be stripped from the reply as it is passed back to Canvas. Please make students aware of this, and set up Assignment dropboxes in your course for students to send important files.  

·        See the following Canvas guides for step-by-step instructions for using the Inbox.


Monday, June 6, 2016

Tips for the First Day of Canvas Courses

Here are some important facts to know about student access to your course.

Course Starts/Ends Date Guide
View more about these settings on the Canvas Guide https://community.canvaslms.com/docs/DOC-1932

Start/End Dates and Publishing Your Course

PUBLISH/UNPUBLISH: (In Moodle this setting was Visible: Show or Hide).  You must publish your course for students to access it.  If it is unpublished, students will not be able to access your course.


STARTS/ENDS DATES: Start and end dates control when students have access to published courses in Canvas. When courses are created, their start and end dates default to the term dates the course is created in.  FaCIT/IS staff have set term dates to coincide with the Sauk Academic Calendar. The start date is set for the first day of the semester.  The end date is set for the last day of Finals Week.

When to Publish

You can publish your course at any time.  Students will not be able to access your course until the the dates set by the term, which is the first day of the semester.

Allow Early Student Access

If you want students to begin participating in your course before the start of the semester, you must both publish the course and manually change the start date for the course in the course settings.  You MUST click the box so that “Users can only participate in the course between these dates.”


Access these settings in the Course>Settings menu.

Wednesday, May 18, 2016

Orient Your Students to Your Online Course - Best Practices

Your online students need your help.  

Learning to navigate your course online is just one challenge online students face.  Along with learning your course expectations, online students have to learn to navigate your online course.  And just like in your face-to-face class, you have students with varying degrees of ability and experience.  Some may have taken a course in Canvas before,  perhaps even one of your courses.  Others will be new to Canvas or even new to online learning.

A few suggestions to help your students. 

Welcome your students to your online course with an introductory email.  FaCIT has created an email message template you can modify for your use. 

Direct students to the free, online course, Orientation to Online Learning.  This course walks students through the basics of functions of Canvas.  Add a link to the course by copy and pasting this URL, https://svcc.instructure.com/courses/65,  to your Canvas front page and into your syllabus.

Create a few introductory or practice assignments for your students.  Here are a few examples.
  • Have students upload a "What I want to learn from this course."  Students will gain practice uploading files. 
  • Create an introductory discussion, have students introduce themselves by posting a reply.  Students will then have practice posting to discussions. 
  • Create a "Syllabus and My Course Policies" quiz. Ask questions to ensure students know important details about your class.  Students will gain practice with the quiz tool and also learn about your course. (Also, you will have on record that students were aware of due dates and policies.) Here are a few example questions: 
    • I accept late work.  True/False
    • Weekly assignments are due each week on [INSERT DATE and TIME]
    • The best way to contact me is?
    • My office number is?
    • Quizzes are what percentage of your final grade?
    • Assignment {INSERT ASSIGNMENT NAME} is due on what date?
  • Pre-assess students.  Use publisher provided test questions to assess your students prior-knowledge of content.  
More ice-breaker or introductory activities for online courses can be found here

Do you have other examples of how you acclimate students to your online course?  Please post them in the comments. 

Wednesday, May 11, 2016

Canvas: Where to find help

Picture this: you are working at home, it is 11:00 p.m. on a Friday evening; a question about Canvas comes to your mind. Where can you go to find answers?

Canvas provides tutorials for all functions of the system. If you prefer to read through and examine images of the Canvas interface, the text-based Canvas Guides are likely to appeal to you. Video tutorials are also available.

Finally, if you are just getting started with Canvas, FaCIT recommends the Canvas Instructor Getting Started Guide.

Monday, April 25, 2016

Learn about Canvas Pages

Today’s addition to the FaCIT Update blog examines Pages in Canvas. First, we’ll examine how to create and add content to a Page by watching a short video, and then explore some ways to use Pages in your course. Finally, we’ll learn more about adding interest to Pages by utilizing the Rich Content Editor.

Most instructors will want to create some content pages in their new Canvas courses.
The uses for content pages may vary; some pages will simply provide a place to impart lesson information to students as in this example. 
  
A well-constructed Content page may become your course home page, serving as both an introductory and organizational tool for your course, as in the examples found here and here.

Other course home pages may include multiple images and navigational links to course modules, providing an attractive and inviting landing page for students from which they can move through the entire course. An excellent example of formatting may be viewed at this link.

Canvas makes adding links, images, video, or audio simple. View this video to learn how to use the Rich Content Editor to add interest to your Pages

The Rich Content Editor does allow for the insertion of various font colors, background colors, and so on. However, keep in mind that basic principles of Universal Design still apply to the pages you create; in order to allow users with visual or learning impairments to fully utilize your page, stay with high contrast colors such as black font on white background. Remember to avoid using color-coding to convey meaning or to separate sections unless the section heading is also tagged as a heading; the meaning will not be available to persons who are colorblind or using screen readers. For text, use bright red color sparingly, use bright blue only for hyperlinks, and do not underline text unless it is a hyperlink.

For more information about Pages, see the Canvas Guides.