Hi, everyone. It's Val Sleger. Robin asked me to create a guest post showing how to aggregate the attendance data stored in Canvas. By using a tool within Excel called a PivotTable, you can quickly generate counts of absences, lates, and presents for each student in your class.
Here's a little movie to show you how. I also have a handout prepared, but there isn't a way to attach it to a blog post. If you are interested, drop me an email and I'll send it to you.
Hope you find this helpful!

Thursday, October 6, 2016
Monday, September 19, 2016
News from Canvas - Gradebook change
The most recent Canvas update included news of a new feature added to the gradebook.
According to the Canvas news release, "If an instructor adds an excessive amount of extra points to a student’s grade, Canvas generates an alert notifying that the student was awarded an unusually high grade. This update helps instructors be aware when excessive points are entered in the Gradebook. Excessive points can occur when the amount entered is 50% above the total possible points or when an extra digit is entered (e.g. 500 instead of 50). The alert is also generated if an assignment is given negative points. Alerts only apply to assignments with total points; they do not apply to assignments with no points possible or excused assignments."
The alert will also appear in Speedgrader.
Thursday, September 15, 2016
Use Google Calendar appointment slots
Google Apps Learning Center and Google Help have wonderful tutorials on all things Google. Here is a link to a little gem I just discovered - Use Google Calendar appointment slots.
Please note that this feature is available only for Google Apps for Education.
Please note that this feature is available only for Google Apps for Education.
Tuesday, September 6, 2016
Academic Integrity - Are your students really who you think they are?
Today I'd like to share a blog post on a subject that fills faculty and administrators of online programs with dread - the various ways students can cheat in online courses.
Recently, The Chronicle of Higher Education published an in-depth article relating the methods used by companies that promise to take a student's online course for them for a fee, now dubbed "Contract Cheating." You may find it an intriguing read. Be sure to open and read this while on campus; SVCC has a subscription. Faculty and Staff trying to read the article off campus have not been able to access the document.
We would love to see suggestions in the comments as to how this sort of cheating can be detected.
Monday, August 29, 2016
The Many Adventures of Test Bank Installation, Pt. 2: Importing Blackboard test banks
Blackboard has been a dominant LMS throughout higher education for many years. As a result, most publishers provide question banks formatted for the Blackboard LMS. Canvas users are able to import these question banks into their courses. Follow the steps below to import a Blackboard test bank.
1. Obtain the Blackboard test bank from the publisher's website.
2. Once you have obtained the file, right click on the resulting .zip file and select Extract all.
A small window will appear where you will select a location on your computer for the files. Select Extract.
4. Open the Canvas course.
5. Navigate to Settings.
6. Select Import Content into This Course from the right side of your screen. (note: on some smaller computer monitors, the content normally on the right side may display on the bottom of the screen when you scroll down.)
5. From the Content Type drop down menu, select Blackboard 6/7/8/9 export .zip file. (See video below step 9)
6. Browse for the file on your computer and select. (See video below step 9)
7. From the Default Question bank dropdown menu, select Create new question bank. (See video below step 9)
8. Select the All content radio dial. (See video below step 9)
9. Select Import, and wait for the file to upload. (See video below)
1. Obtain the Blackboard test bank from the publisher's website.
| a. Locate the instructor resources on the publisher's website. |
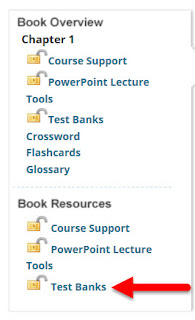 |
| b. Select the link to the test banks. |
 |
| c. Accept the license agreement. |
 |
| d. Download the test bank files. |
A small window will appear where you will select a location on your computer for the files. Select Extract.
 |
| e. Extract files. |
3. Open the extracted file folder; notice that there is a .zip file for each chapter.
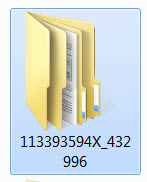 |
| f. Folder with extracted files. |
 |
| g. Notice that each chapter has a .zip file; these should remain zipped for the next step. |
5. Navigate to Settings.
 |
| h. Course settings |
6. Select Import Content into This Course from the right side of your screen. (note: on some smaller computer monitors, the content normally on the right side may display on the bottom of the screen when you scroll down.)
 |
| i. Import content into this course link at the right of the screen. |
5. From the Content Type drop down menu, select Blackboard 6/7/8/9 export .zip file. (See video below step 9)
6. Browse for the file on your computer and select. (See video below step 9)
7. From the Default Question bank dropdown menu, select Create new question bank. (See video below step 9)
8. Select the All content radio dial. (See video below step 9)
9. Select Import, and wait for the file to upload. (See video below)
10. Repeat steps 6 - 9 for each chapter.
The Many Adventures of Test Bank Installation, pt. 1 - Importing .QTI Files
Beginning this week, the FaCIT Update blog will share a series of posts on the topic of inserting test banks into Canvas courses. Each post in this series will illustrate another method to install a test bank in Canvas based on the type of test bank provided by the publisher.
As Canvas gains market share in Higher Education, more publishers are providing test banks formatted for the Canvas LMS. Canvas test bank files have the .QTI extension. Should you be so fortunate as to have access to a test bank formatted for the Canvas LMS, importing it to your course will be easy. Follow the steps below to successfully import your Canvas test bank.
1. Download the test bank from the Publisher's website.
2. Once you have obtained the file, right click on the resulting .zip file and select Extract all.
A small window will appear where you will select a location on your computer for the files. Select Extract.
3. Open the extracted file folder; notice that there is a .zip file for each chapter.
4. Open the Canvas course.
5. Navigate to Settings.
6. Select Import Content into This Course from the right side of your screen. (note: on some smaller computer monitors, the content normally on the right side may display on the bottom of the screen when you scroll down.)
7. Select .QTI zip file from the drop down menu.
8. Browse for, and select, the .zip file for the chapter you need. (See video below step 10)
9. Enter a name for the test bank; FaCIT advises including the author's name and edition of the book or the semester and year in the name in order to identify the bank for deletion when a new edition is adopted in the future. (See video below step 10)
10. Select Import, and wait for the file to load. (See video below)
11. Repeat for each chapter.
As Canvas gains market share in Higher Education, more publishers are providing test banks formatted for the Canvas LMS. Canvas test bank files have the .QTI extension. Should you be so fortunate as to have access to a test bank formatted for the Canvas LMS, importing it to your course will be easy. Follow the steps below to successfully import your Canvas test bank.
1. Download the test bank from the Publisher's website.
 |
| a. Locate the instructor resources on the publisher's website. |
 |
| b. Select the link to the test banks. |
 |
| c. Accept the license agreement. |
 |
| d. Download the test bank files. |
A small window will appear where you will select a location on your computer for the files. Select Extract.
 |
| e. Extract files. |
3. Open the extracted file folder; notice that there is a .zip file for each chapter.
 |
| f. Folder with extracted files. |
 |
| g. Notice that each chapter has a .zip file; these should remain zipped for the next step. |
5. Navigate to Settings.
 |
| h. Course settings |
6. Select Import Content into This Course from the right side of your screen. (note: on some smaller computer monitors, the content normally on the right side may display on the bottom of the screen when you scroll down.)
 |
| i. Import Content into this course link at the right of the screen. |
7. Select .QTI zip file from the drop down menu.
 |
| j. .QTI file. |
9. Enter a name for the test bank; FaCIT advises including the author's name and edition of the book or the semester and year in the name in order to identify the bank for deletion when a new edition is adopted in the future. (See video below step 10)
10. Select Import, and wait for the file to load. (See video below)
Monday, August 1, 2016
Customize Course Navigation in Canvas
In Canvas, instructors are empowered to control the appearance of the navigation menu in their course. One reason to do this is to direct students to resources in the most straightforward way possible. The best way to direct students is by linking all resources and assignments on the Modules page. This is simplest for students, ensuring that they see all of the linked resources for a unit in the order in which it is organized and presented.
Another reason to control course navigation has to do with the manner in which Canvas handles course files. If the Files link is visible to students, students can access every course file that has been published in the history of a course, even if the link to it has been removed from the Modules page. By directing students to files via a link on the Modules page, you can be sure they are viewing and downloading the correct file.
Canvas provides an excellent step-by-step tutorial for customizing navigation.
FaCIT suggests that most instructors will want to leave the following items visible to students:
Home
Announcements
Syllabus
Modules
People
Grades
NetTutor
Attendance (will not be visible to students, but leaving it in the main navigation section will make it much easier for instructors to see and use)
FaCIT suggests that the following items be hidden from student view, with each relevant item instead linked to the Modules page.
Files
Assignments
Quizzes
Conferences
Collaborations
Discussions
Outcomes
Pages
FaCIT recommends that SCORM remain in the visible section of the navigation while uploading a SCORM unit; after the unit is uploaded and linked on the Modules page, the SCORM navigation link can be moved to the hidden section of the course navigation panel.
Subscribe to:
Posts (Atom)